Whether you just want to update the appearance of your RV, or you’re preparing to sell it and want to remove any stickers that will turn off potential buyers, knowing how to remove decals from your RV isn’t difficult. There are several methods that work well, depending on what type of decal you have and what kind of surface it’s affixed to. If you’re ready to get rid of those old decals, check out this guide on how to remove RV decals easily and without damaging your RV!
Table of Contents
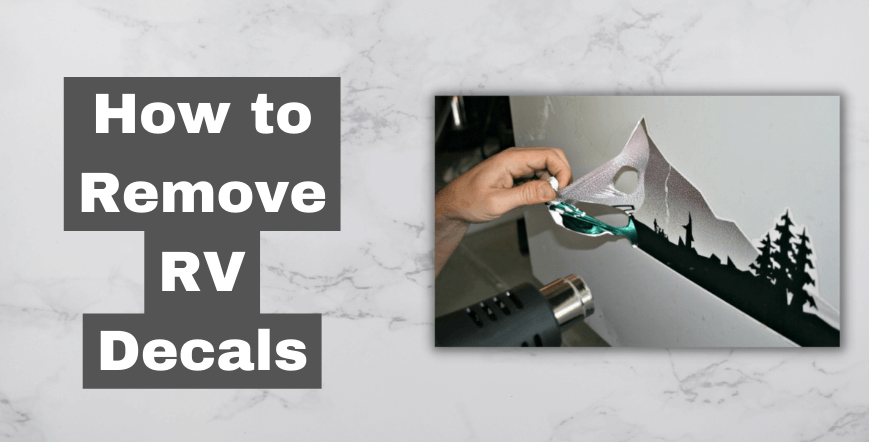
How to Remove RV Decals
What You Need to Get Started:
Here are the steps to take when removing an RV decal or any other decal from a vehicle:
- Make sure you have your trusty decal remover available before beginning. You may need some rubbing alcohol, liquid dish soap, cooking oil, or nail polish remover depending on the type of decal you’re trying to remove. Try all three types and see which one works best for your particular application.
- Find a place where you can work with plenty of space around it so that the adhesive doesn’t touch anything else while you’re working. Place newspaper down to catch any drips or sticky residue left behind by the decal remover.
- Spray or soak the back side of the decal with your chosen type of remover and let it sit for 10-15 minutes while softening up the adhesive that holds it in place.
- Use your fingers or an old credit card to gently pry away at the edges of the decal. It will come up much easier than you might think!
- The last step is to use paper towels (or another absorbent cloth) soaked in water to wipe away any leftover adhesive, leftover vinyl film, and cleaner residue from your RV’s surface.
- Finally, admire how great your RV looks now that it’s free of those pesky old stickers!
Step 1 – Preparing The Surface:
Before you can even think about removing the RV decal, you first need to prepare the surface. Scrubbing your RV with a medium grit abrasive pad is an important step because it will help break down any adhesives that have built up over time. After scrubbing thoroughly, rinse off any residue with a hose or spritz of water. Any remaining dirt or dust particles can be removed with a damp microfiber cloth.
Step 2 – Removing the Decal:
In order to remove your RV decal, you’ll need a towel or rag. Wet the towel with water and thoroughly wet the decal by making sure it is completely saturated in water. After you have the towel, all set up, you’ll want to use it to wipe away any dirt that is on top of the decal. Once you do this, get another dry towel or rag ready. You’ll then take the wet towel and scrub the decal until it starts to peel off. The trick here is to make sure you aren’t applying too much pressure when doing this because it can cause damage to the RV if you are too rough with removing the sticker. If there are any stubborn parts of the sticker left, just re-wet them again and continue wiping until they come off.
Step 3 – Clean Up:
As you remove the decal, you might notice that some of the adhesive has transferred to your RV. For a more thorough clean up, use adhesive remover from an RV specialty store or auto-supply shop. This special solvent will dissolve adhesive without damaging paint or the other surfaces of your RV. Spray on, wait 15 minutes for it to penetrate, then scrape off with a plastic putty knife. The decal should now be completely removed from your RV with minimal time and effort required on your part!
Step 4 – Removing RV Decals With HEAT:
RV decal removal can be done without harming your RV by using heat. Vinyl-based decals can be removed safely by immersing the decal in a pot of hot water that has been brought to a rolling boil. Cover the pot with a lid and let it sit for about 10 minutes. Carefully remove the now-weakened vinyl decal from your RV, pulling slowly but firmly at one corner of the decal until it starts sliding off.
The next step in removing RV decals is making sure you have a hair dryer handy. Running the hair dryer on low heat for about three minutes at the edge of the decal will soften up the adhesive, making it easier to peel off. Be careful not to hold it too close; this may cause your RV surface material to melt!
What about adhesive removers?
First, you want to take a look at the adhesive remover you have available. The label will be your guide for whether or not this is the best way to remove decals from your RV. There are plenty of choices for RV owners, so it doesn’t hurt to try a few options before giving up on removing those vinyl stickers.
If the adhesive remover does not work with your decal material, try using an aerosol cooking spray instead.
Eraser Wheels:
One tool you can use for rv decal removal is an eraser wheel. Eraser wheels are great because they won’t damage your RV paint job, and the vinyl adhesive will stick to the rubber rather than cling onto paint or metal. To get started, ensure your rv decal is clean from any residue like dust or dirt that could interfere with the remover process.
Using Traditional Solvents:
Wet a paper towel with nail polish remover, or an acrylic paint thinner, then put it on the decal and leave it for 10 minutes before taking a scraper to the sticker. This will loosen up the adhesive enough that you can peel the decal off without damaging the surface of your RV. If you don’t have any solvent at home, rubbing alcohol also works just as well. Be sure to test either solution in an inconspicuous spot first to make sure they won’t damage the paint on your RV.
Conclusion:
So, there you have it! Removing decals from your RV can be as easy as using simple household items. We hope that this post has given you a few helpful tips, so if you found it useful then please share with a friend or two. And if you know of any other secrets for how to remove decals from your RV please let us know in the comments below! Have a happy, and sticker-free day.