After returning from an RV trip, recharging the vehicle’s power system becomes necessary for all RV travelers. The good news is that you can perform this task at home by creating an electrical system that allows your RV to connect to your home’s power grid. Before you begin any electrical work, brush up on your knowledge of electrical terminology and tools. It’s better to be safe than sorry when dealing with electricity. Always make sure to disconnect the power safely before attempting any electrical work. If you’re unsure about handling electrical installations, it’s best to seek professional help. If you can install a 50-amp RV outlet at home, the following steps will guide you.
Table of Contents
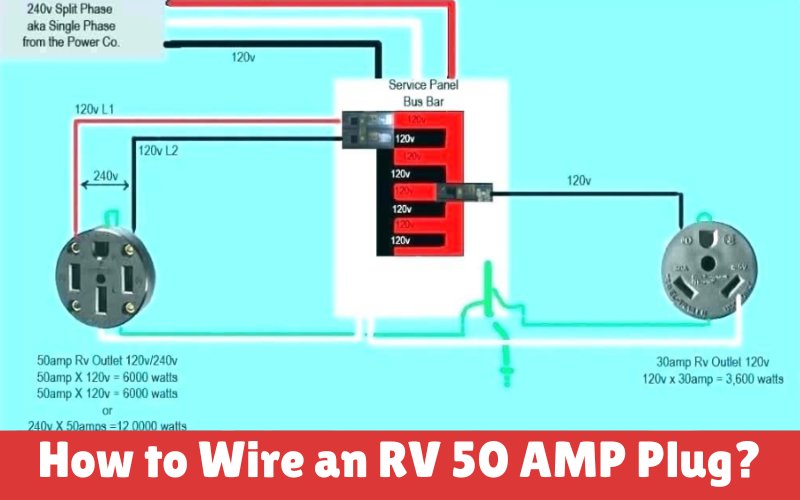
How to wire an RV 50 amp plug?
Gather Materials
Before installing your 50 amp RV outlet, ensure you have all the necessary materials. You’ll need a 50 amp RV electrical box, a 50 amp RV electrical cable, a 50 amp RV male plug, a 50 amp RV female plug, a 50 amp RV outlet cover, a 2-pole circuit breaker, and a ground fault circuit interrupter (GFCI). You can find all these items at your local hardware store or online. Once you have everything you need, prepare the area where you’ll install the Outlet by clearing any debris and ensuring there’s no water nearby.
Turn Off Your Main Breaker To avoid accidents:
Turn off the main breaker at the main panel before starting any electrical work. Use a multimeter to double-check that the power is off before proceeding. It will help you stay safe and avoid any unnecessary risks.
Make Sure Enough Breaker Space Is There:
Check your electrical panel to see if there’s enough space to install a 50 amp breaker. If not, you may need to ask an electrical professional to install a subpanel or upgrade your current panel. To create space for your new 50 amp RV service, relocate some breakers to the sub panel. Once you have the necessary space, you can move on to the next step.
Choose a Safe Location:
Choose a dry and level location to install your Outlet that is not near any water sources. Ensure there’s enough space around the Outlet for proper airflow and to prevent any potential sparks from starting a fire. Install a power box to house the RV outlet and ensure the wiring is grounded and insulated.
Measure the Wiring:
Examine the wiring diagram for a 50 amp RV outlet to ensure you have enough wire for your project, and create a wiring schematic that includes the wire configuration. If you decide on a side installation, measure the distance from the Outlet to the ceiling and down the side to the panel. Purchase extra feet of wire to account for bends and twists.
Install the Outlet Box
Mount the outlet box on the wall and drill a hole in the rear of the box to run the wires and create a cleaner appearance. Make sure the box is level and securely attached to a stud. Drill the designated hole through the wall and the box using screws. A single-gang plastic box suited for a 20 amp outlet will work, but others are intended for “ancient work” and don’t require the wall to be opened up.
Install the Wiring
Before connecting any electrical components, running the wires for the RV outlet is important. Connect the outlet box to the main breaker panel using a rigid or soft conduit. A rigid conduit will keep the wires tightly secured, while a soft conduit will be easier to work with. Ensure the wires are routed according to your plan and secured every few feet with metal straps or zip ties to prevent them from moving or becoming damaged. Following the legal requirement to run the cable through a protective tube above ground and up to 18 inches deep is also important.
Connect the Cables to the Outlet:
After connecting the green ground wire to the ground bus, attach the white neutral wire to the neutral bus in the breaker box. Connect the black and red hot wires to the 50-amp breaker’s terminals. The order in which you connect the hot wires doesn’t matter. Ensure the ground wire is connected to the ground and the white wire to the neutral. Once all cables are connected correctly, tuck them carefully inside the box and use tape to secure them. Finally, screw the box shut, careful not to pinch the wires.
Install the Breaker:
Attach the 50-amp breaker to the electrical panel and connect it to the wires entering the pipe. Remove the electrical panel cover and insert the two black or black/red wires into the unseated busbar-mounted breaker. Connect white, green, or bare metal wires to the ground and neutral buses. These buses typically have small holes for easy wire insertion. Once you’ve finished, reconnect the breaker panel, install a surge protector, or test it with a multimeter to ensure everything functions correctly.
Test the Power
Before using the Outlet, use a voltmeter or non-contact voltage tester to ensure electricity flows to it. Turn on the main power and switch the breaker to the RV outlet. Open the outlet box and use a multimeter to check for electricity. Make sure everything is working correctly before connecting your RV to the Outlet. Test your RV’s equipment, including the microwave, to ensure everything works properly. Always be cautious and double-check to avoid mistakes that may cause harm or damage.
Conclusion: How to Wire an RV 50 AMP Plug?
Wiring an RV 50 amp plug can seem like a daunting task, but by following the necessary steps, it can be done safely and effectively. It is important to ensure that you have the proper tools and materials and a good understanding of the electrical system in your RV and the requirements for the 50 amp plug. Taking the time to plan and properly run the wires, connect the cables, set up the breaker, and power test can ensure that your RV is ready to use and that you and your family can enjoy a safe and comfortable trip. It is best to consult a professional electrician if you are unsure or uncomfortable with any aspect of the wiring process.